GENERAL ASPECTS
The following description
of laparoscopic surgery and suturing may act as a short overview regarding the most common suture techniques applied in laparoscopy. Due to various techniques employed when closing wounds in laparoscopy this overview
is not designed to give a complete picture. However, it will cover the most important steps of dealing with sutures and needles in laparoscopy. Extra-corporal suture techniques are also covered in this brochure, although most laparoscopic surgeons will perform suturing without this special method.
In order to obtain further information with regard to learning laparoscopic surgery it is highly recommended
to prepare by reading additional information and – above all – with extended training.
Various aspects of laparoscopy are covered in brief:
- Insertion of the needle through a trocar
- Needle handling
- Single knot suturing
- Continuous suturing
As one of the first steps in laparoscopic surgery trocars are placed into the abdominal wall, using trocar spikes, by an open (mini-laparotomy) or blind approach. Correct placement of the different trocars to guarantee the most efficient handling of instruments and needles is crucial for laparoscopic surgery (see illustration). The recommended distance between trocars should be around 10 cm, depending on the procedure.
To use a trocar for suturing, the trocar should have a minimum diameter of 5 mm. 10 mm trocars are more convenient but might require the use of a reduction tube to decrease the trocar’s diameter. The application of a reduction tube excludes the risk of damaging the sensitive trocar membrane by the sharp needle during trocar passage (depending on the trocar model). The risk of losing a needle which does not slide properly inside the trocar is also minimized. Disposable or semi-disposable trocars (for example Olympus TroQ+) eliminate this risk by providing a perfect new trocar membrane at any time.
When 5 mm trocars are used, straight needles or ski-needles have to be used. With 10 mm trocars curved needles can also be employed.
For insertion of the scissors to cut sutures or other hand instruments 5 mm trocars are common. For the telescope and the needle holder insertion 10 mm trocars are more suitable.
Correct camera work for suturing
When the needle is introduced into the body, the view of the surgical field should be wide. Once the surgeon prepares to load the needle holder with a needle the camera view should be zoomed in on the tip of the needle holder and the needle itself to allow identification of the finer details required to load and angle the needle correctly. After the needle is placed through the tissue, the camera view should again be focused on the needle in order for it to be grasped. Finally, the needle is reset and tying the knot can begin. While the knot is being tied, the camera angle should again alternate between focusing closely on angling the needle and a wider view of the surgical site.
Basic suturing
All laparoscopic suturing requires the use of both hands. Both instruments must be working in a coordinated fashion during the entire process.In general, try to ensure that the arms and shoulders are relaxed and when performing suturing one should be aware of posture, instrument motion, etc.One hand should feed the other in order for both instruments to work in a coordinated manner.
Needle Holder
Needle holders have a locking system. This ratchet mechanism is generally of two different types: either a graduated ratchet (for example Olympus) or an “all-or-none” type. The graduate mechanism allows the surgeon to control the amount of force holding the needle in place. Applying additional pressure will engage the ratchet further. One can hear and feel the clicks as the ratchet teeth engage each other. In this scenario there is little danger of inadvertently releasing the needle. The “all-or-none design” only completely fixes the needle when maximum pressure is applied to the mechanism. The graduated ratchet allows for easy manipulation of the needle within the jaws, even when the mechanism is partially engaged. The jaws can be either smooth or serrated to allow for a light or strong grip on the needle. The instrument tip can be straight or slightly curved (left and right handed).Self-aligning designs have a bottom lever that is U-shaped in a cross-section and a top lever which is a narrow bar. When the jaws are closed, they will become correctly aligned perpendicular to the line of the jaws even if the needle is placed in the jaws at an oblique angle.
This kind of needle holder is intended for laparoscopic beginners although it is also useful to support the experienced surgeon in time efficient suturing.
Insertion of the needle through the trocar
To insert (and remove) the suture and needle through the trocar the suture should not be held at the needle. This is different to open surgery. A loosened needle during insertion or removal
can cause serious problems and a
lost needle is difficult to find inside the abdominal cavity.
Using a reduction tube inside a 10 mm trocar to introduce a needle into the patient is common practice and recommended by many surgeons.
The different steps are as follows:
- The needle holder is inserted into the reduction tube.
- The needle holder will grasp the suture approximately 3 cm behind the needle.
- The needle is pulled into the reduction tube smoothly until the needle is completely covered and protected inside the tube.
- he reduction tube with the needle holder inside is inserted into the 10 mm trocar and passed through the abdominal wall of the patient. This is done under visual guidance until the needle can be seen coming out of the reduction tube.
- The left-hand grasper or assistant needle holder picks up the needle, approximately in the middle of the needle, with the needle tip oriented towards the left.
- Needle correction: The needle needs to be corrected before the needle holder can grasp it in the optimal position for driving. This is attained by the needle holder grasping the suture approximately 2 cm from the swage end of the needle and twisting it into an upright position.
- After the needle is corrected on the grasper, the needle holder can now grasp the needle at a point two-thirds away from the tip (or one-third from the swaged end of the needle).
The angle of the needle to the needle holder shaft is now accomplished. - The removal of the suture is done the same way as during insertion by grasping the suture close behind the needle.
- The reduction tube remains in place during the whole procedure.
End of laparoscopic procedure
The needle holder and the reduction tube are removed from the trocar simultaneously. The trocar itself is fixed into position using the right hand in order to avoid any unintended movement out of position. Under visual control the 10 mm trocar is removed using slow rotating movements. Then the trocars (5 mm) are removed by slow rotation, also under visual control. Finally the telescope trocar is removed. Trocar incisions may be closed by suturing, depending on the amount of trocars and the diameter of the trocars used. It is recommended to close a fascial incision with a diameter more than 5 mm by using suture for example by using a fascial closure needle.
Needle handling
Correct needle handling:
Drive the needle vertically into the tissue and follow the needle curvature.
Roll the needle through tissue without tearing through it. By following this guideline, the needle will not be damaged and tissue damage can be minimized accordingly.
Incorrect needle handling:
Incorrect needle manipulation can result in abnormal needle bending, increased tissue trauma and breakage of the needle. This can happen when the needle is grasped at the very end, or the stitch is not performed in a direction perpendicular to the tissue, or the tissue passage is not in line with the needle geometry.
Suturing
Laparoscopic intracorporeal suturing is a complex task involving several integrated skills including needle handling, suturing and knotting. Generally, the suture should be as short as possible for the given task at hand. If the suture is too long it is difficult to find the end of the suture and that can lead to entanglement. If the suture length is too short, the end can pull through tissue accidentally before it is tied or leaves the surgeon with suture ends too short for tying with ease.
Intracorporeal
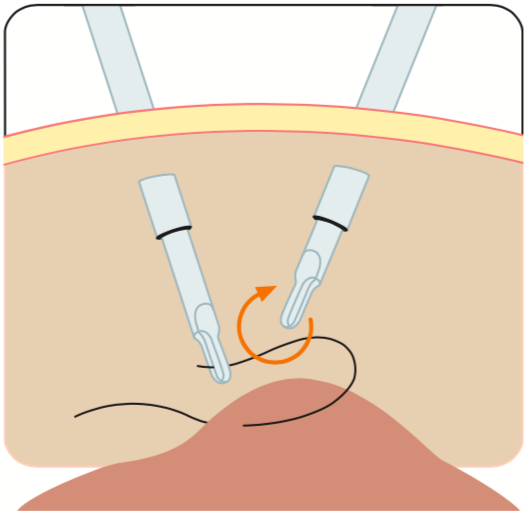
Intracorporeal suturing with the single knot technique can be performed by using needles and sutures known from conventional surgery. The single and most important issue is the length of the suture and the ability of the needle to pass through the trocar and the reduction tube. Stitch the needle vertically, follow the needle curvature by “rolling through the tissue” without tearing through it. After tissue penetration, the needle is best grasped with the needle holder at a 90° angle and a surgical knot is performed. The free needle holder is passed at least twice around the assistant needle holder or grasper holding the suture. The short end of the suture is grasped and the first double knot is tightened.
As in open surgery, at least two additional single knots are placed to secure the knot and to avoid unintentional knot opening.
Single knot interrupted suturing results in a very good tissue approximation but it takes time to perform and is difficult to do with a laparoscopic approach. Continuous suturing is much quicker and much easier to perform especially in laparoscopy.